Angular CLI + gulp: Versioning your application made easy!
Hi there! Today we are going to create a simple, yet useful pipeline to keep track of our Angular application version. We are also going to display the version number somewhere in our application. As a bonus, we will see how to send the version number to a 3rd-party error reporting service. For convenience, here is a simple flow chart describing the process we will achieve by the end of this tutorial:
Why would we want to do this?
Let’s assume we have a web app with a bunch of users. Our team is constantly publishing new features and fixing bugs in production. After some QA and testing, we pull the trigger and the new shiny version goes live. Time goes by, and after a few new versions… BAM!!!💥 Suddenly, we start to receive complaints from some of our users. But wait, which version caused the issue? The lastest one? Maybe we have unintentionally introduced a regression several releases ago?
Wait… How is it possible that only some users affected?
Well, if for example, your web app is distributed through a misconfigured CDN, your users might get different versions of the same web application. Actually, this is exactly what happened to us at Tastewise! Some of our clients complained about a bug, but we already fixed it a few days ago. We needed to find out which version our clients are using…
Anyway…
You don’t need to guess the version number anymore! Just attach it to error reports or ask your users directly what version they use!💪
Can’t wait to see it in action? Me too! Let’s do it together!
Ingredients list
Note: In this tutorial, I will be using Angular CLI v6.0.7, Angular v6.0.3 and gulp v4.0.0, but you will achieve the same result in any Angular version 2+. We will also need some additional libraries, such as minimist in order to pass (parse) arguments to (in) our gulp task.
In case this is the first time you hear the word “Angular”:
Angular is a platform that makes it easy to build applications with the web. Angular combines declarative templates, dependency injection, end to end tooling, and integrated best practices to solve development challenges. Angular empowers developers to build applications that live on the web, mobile, or the desktop.
Gulp, however, might be less familiar for some people. For those, I recommend reading a great article by Brandon Clapp “What is gulp.js and why use it?”. Brandon shows examples and guides the reader through the process of creating a gulp task. To describe gulp in simple words:
gulp is a toolkit for automating painful or time-consuming tasks in your development workflow, so you can stop messing around and build something.
Time to integrate these two!

1. Create a new project using Angular CLI
ng new ng-demo-version-app2. Create a staging environment
Go to angular.json and create a new configuration section:
Then, create a new file called environment.staging.ts and place it in app/environments/ directory. For now, it will contain only one property:
3. Add a version property to our environments
We will initiate a new version number for production and staging environments, and a placeholder for a version number in our local environment. The files should look like this:
4. Install gulp, gulp-replace, and minimist
npm install -D gulp gulp-replace minimistIn this tutorial, we do not need these libraries in production, therefore we‘re installing it using the “save-dev” (-D) option.
5. Update package.json
We will now create a new script which will be updating the version number(s) with gulp. We need to make sure our script is aware of our environment in order to update the appropriate version number. In order to do so, let’s create the following scripts:
“ng:bump-version:dev”: “gulp ng-bump-version --configuration=staging”,
“ng:bump-version:prod”: “gulp ng-bump-version --configuration=prod”
Now let’s create two build scripts:
"build:dev": "npm run ng:bump-version:dev && ng build",
"build:prod": "npm run ng:bump-version:prod && ng build --prod"
Finally, we redirect the default build script to build:dev:
"build": "npm run build:dev"The above steps should result in package.json that looks like this:
// ...
"scripts": {
  "build": "npm run build:dev",
  "build:dev": "npm run ng:bump-version:dev && ng build",
  "build:prod": "npm run ng:bump-version:prod && ng build --prod",
  "ng:bump-version:dev": "gulp ng-bump-version --configuration=staging",
  "ng:bump-version:prod": "gulp ng-bump-version --configuration=prod"
}
// ...
6. Create gulpfile.js
Time to create our gulp task which will be executed on every new build:
In simple words, the task performs the following:
- Resolves environment.{configuration}.ts file,
- Using regex, it looks for a string matching “version: X.Y.Z.W”.
- It increases the W (build) number.
- Logs the new version to build console and replaces the environment file with the newer version number.
As simple as that…
7. Consume the version number in a component
First, inject the version number into app.component.ts:
Then, show it in app.component.html:
Run the application using the CLI command ng serve and visit http://localhost:4200. If done right, you should see the following:

Now let’s initiate a new build by running the following CLI command: npm run build:

We can verify that the version number was increased by observing environment.staging.ts:
8. Bonus: Send a version number in Sentry error reports
In this demo, we will use Sentry. In case you haven’t heard about Sentry yet, it is used by many enterprises including PayPal, Dropbox, Airbnb, Uber, and Microsoft. Simply put, Sentry is:
Open-source error tracking that helps developers monitor and fix crashes in real time. Iterate continuously. Boost efficiency. Improve user experience.
And this is one of the best parts of Sentry:
We will start by installing @sentry/browser npm package:
npm install --save @sentry/browserThen, in app.module.ts, we will initialize Sentry with environment name and version number:
import { environment } from "src/environments/environment";
import * as Sentry from "@sentry/browser";Sentry.init({
  dsn: "https://(hash)@sentry.io/(project-number)",
  environment: environment.production
    ? "production"
    : "development",
  release: environment.version
});
Finally, define a default error handler and provide it to providers in app.module.ts:
Now let’s add a button to our application which throws an error…
Add the following function to app.component.ts:
public throwError(): void {
  throw Error("Error test!");
}
Add a button to app.component.html:
<button type="button" (click)="throwError()"
        style="align-self: center;
               height: 4rem;
               width: 8rem;
               background: none;
               border-width: 1px;
               border-color: blue;
               border-radius: 0.3rem;
               color: blue;
               font-family: monospace;
               cursor: pointer;">
   Throw Error
</button>
Now let’s click the button to throw the error and see how it looks in Sentry:
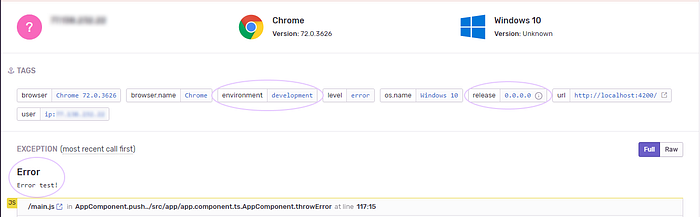
Cool, huh? We see the environment and the release (version) number of the application which caused the error! In the example, the version number is 0.0.0.0 because I threw the error from my local environment; In production/development environments we will see the correct numbers! You can even add your code repository to Sentry, and it will suggest which developer made the commit causing the error! I personally haven’t tried this feature, but if you did, please let me know how it works!
As we all know, application versioning is a very important aspect in software engineering. Of course, this is also true for web apps. As we saw in this tutorial, the process of versioning an Angular application is very simple thanks to the flexibility of the framework and the easiness of gulp tasks.
Disclaimer: The shown implementation is just a way of achieving versioning. The reader is encouraged to read another great article with a different approach written by Austin.
I hope You enjoyed the tutorial and discovered something new! As always, I would love to hear feedback about this solution. If you managed to implement this in a different way, share your solution :)
The demo project can be found on GitHub, and a live demo is available here.
