How to poll a Gmail inbox using cypress.io
UPDATE: This story is now featured on the Cypress.io Blogs. Thank you so much for your support!
Cypress is a trending framework for end-to-end (e2e) testing using a browser. Its simplicity of use will get going even a rookie developer and make him productive writing e2e tests, all within a relatively short time. No wonder why it became so popular and being adopted by more than 1 million developers monthly.

Lately, our web platform has evolved out of stealth mode, gained the first traction with the market, and acquired some strategically important customers. Suddenly, the development team has begun feeling much more responsibility to keep a fully no-matter-what-working platform. This was the moment we knew we need to start writing automation tests (don’t judge us — we are only two developers with an endless list of stuff to do), to ensure that our core functionalities work as expected.
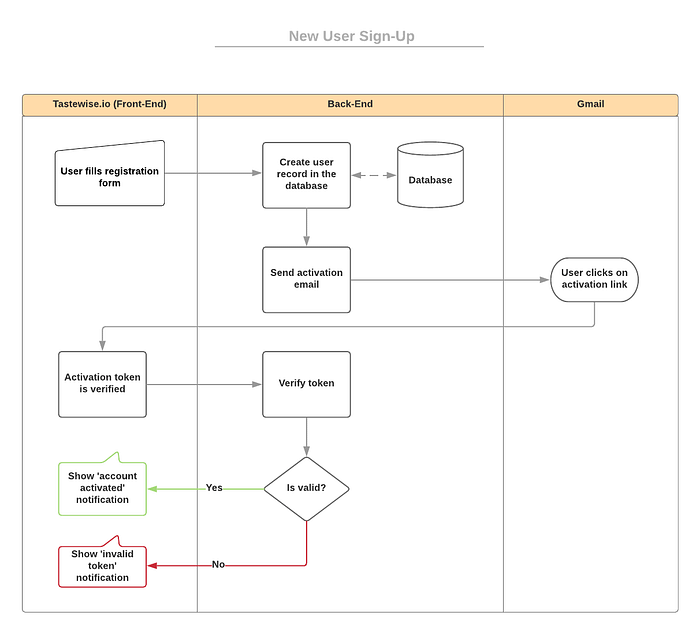
One of our core functions is the sign-up processes. It can be described as the following:
- A new user reaches registration form on tastewise.io;
- She fills some basic information about herself (full name, email password, etc.);
- Once she submits the form, our back-end server updates the database, and if the operation is successful, it queues for delivery an email with an activation link, which will be sent to the email address specified in step 2.
- Once the email reaches the inbox, our user clicks the provided link and can start benefiting from the platform’s advanced features.
To emphasize the process, here is a flow diagram:
The said process is extremely crucial to the success of the company. Remember: each registered user in the platform is a potential customer — we can’t afford to lose a lead because our sign-up process didn’t work. Another reason why a registered user is priceless is because of the early stage of our start-up. Each registered user is our early adopter, and we don’t want to miss them. Having said that, it is our top priority to have this process operating as expected.
Question: How can we rest assured our users can sign-up?
Every experienced developer knows not to reinvent the wheel, so the first thing they do before attempting to solve a task is to search for a ready-to-use solution. Only when no solution exists, or the time to integrate the solution is long, they develop their own solution for the problem.
In our case, we knew we can use Cypress to describe the process, and expect it to make the tedious work of filling out the registration form again and again. After all, our platform is a web application and Cypress is perfect for testing it… But the problem is, Cypress is not designed to test the back-end, and of course not an inbox of a Gmail account. This reason explains why Cypress doesn’t provide an out-of-the-box solution to our need.
Time to write our own solution…
Luckily, Cypress team took into consideration the need for custom “hooks” in the framework. They introduced the plugins system and exposed a command called task(). By their own simple words, task allows you to:
Execute code in Node.js via the
taskplugin event.
Cool! So all we need to do now is to introduce a custom task which will perform our inbox polling. We will leverage the fact task() can accept arguments, and provide it a given inbox address and other parameters, such as how long we will wait for the email to arrive, before giving up and mark the test as failed. Enough words… let’s get to work!
In it’s simplest form, this will be our task skeleton:
In our scenario, in order to make the test pass, three accumulative conditions need to be justified. The activation email we are expecting by the end of the sign-up process has to:
- Be sent from a very specific address: no-reply@tastewise.io,
- Have the words “Confirm your account” in the subject, and
- The recipient's address must be test+(random-number)@gmail.com (e.g test+546544@gmail.com). Of course, we need permission to access the email account test@gmail.com, but we’ll discuss this in a little bit…
Thus, we know our task should have 3 mandatory arguments: from, subject and to. We will extract these straight out of the task’s arguments object — args:
Alright, and now for the fun part. How do we poll the Gmail account? 🤔
After spending some time googling, npm’ing and github’ing, there was no reason not to write a lean Node.js Gmail client.
Giving birth to gmail-tester
gmail-tester is a small library that will handle the Gmail polling for us! 🎉
The first thing we need to do, is to install the library. We’ll do that by running the following command inside our Cypress project:
npm install --save-dev gmail-testerThen, we’ll go to cypress/plugins/index.js, and add the following piece of code:
Let’s see what is going on here…
First, we declare a task called gmail:check which accepts arguments. Then, we’ll invoke gmail-tester’s check_inbox() function. Pay attention to the last two parameters. The bigger the numbers are, the longer your test case might be running.
Whenever we will need to poll an inbox, we will call the gmail:check, as follows. Once a result is returned, we assert it to check it is not null (remember, gmail-tester will return null if it didn’t find the email after the maximum poll interval).
One last step before we can enjoy this functionality: We need to grant gmail-tester permission to check test@gmail.com account. Following the instructions to obtain the credentials JSON file, we will place credentials.json inside cypress/plugins/ directory. Then, while still inside cypress/plugins/ directory, we’ll run the following command:
The first argument is the path to gmail-tester’s init.js file. In our case, the node_modules directory was two steps outside the plugins directory. In the 2nd argument, we provide the generated credentials.json file from the previous step; gmail_token.json is the file name we chose for the OAuth2 token which will be consumed by gmail-tester.
Important note! Do not check-in credentials.json and gmail_token.json to the source control repository. If using git, make sure to exclude this couple in your .gitignore file.
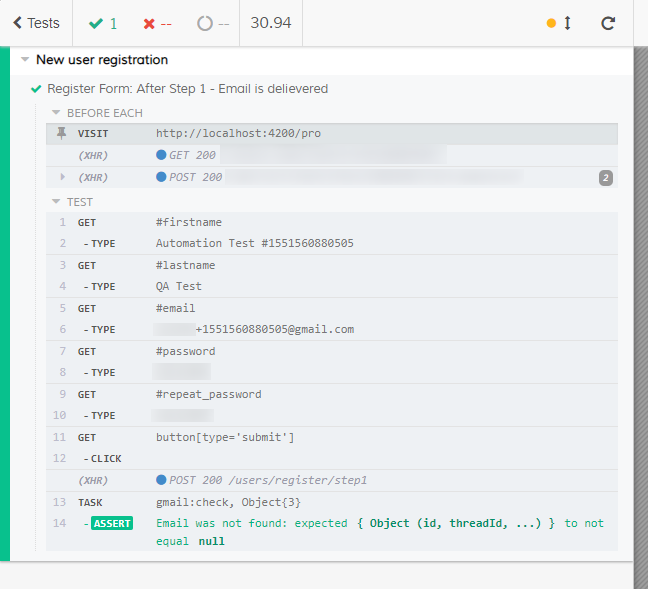
Finally, we can integrate the gmail:check task into our test scenario. Here how it looks like:
Now run the test and watch it pass:
Further plans
Now, once we have this test in place, we will integrate it into our build pipeline. Whenever this test will fail — the build process will fail as well, preventing us from publishing a broken version of the web platform.
Thank you for reading! I hope this article saved you some time to start Gmail polling in a Cypress test case. If you managed to solve a similar issue, I’ll be happy to hear how done it!
If you have any questions, let me know, and I’ll try to help each and every one of you.
You can also ping me @ twitter.
Of course, this awesomeness wasn’t possible without Cypress.io platform! 👏